Mastering After Effects Shortcuts and Layer Architecture
In the high-stakes world of professional motion graphics, the difference between an amateur and a seasoned veteran isn’t just about raw creativity—it is about sheer, unadulterated speed and structural discipline. When deadlines loom and a project scales to hundreds of intricate layers, your survival depends entirely on your workflow.
This guide strips away the conventional beginner tutorials. Instead, we are diving deep into a professional manifesto on how to weaponize After Effects shortcuts, construct impenetrable layer architectures, and implement management systems that will exponentially increase your output speed.
Table of Contents
Part 1: The Muscle Memory of the “Core Five” Tools
In any commercial studio pipeline, 80% of your mechanical interaction with After Effects relies on just five tools. However, professionals do not click these tools; they rely on absolute, ingrained muscle memory.
1. The Selection Tool (V): The Anchor of Sanity
- The Golden Rule: Every time you finish using a secondary tool—whether typing typography or plotting a complex vector path—you must instinctively strike the
Vkey. - Why it Matters: Failing to return to the Selection Tool is the number one cause of accidental layer generation or unintended mask creation, which can severely clutter a timeline.
2. Fluid Navigation: Hand Tool & Zoom Tool
- The Spacebar Override: You should almost never press the
Hkey. Holding down theSpacebartemporarily invokes the Hand Tool regardless of the active tool. Release and you instantly return to your active tool. - Precision Zooming (
Z): Click and drag a marquee box over a specific region to force that area to fill your entire monitor.Alt + Clickreverses this instantly.
3. Rotation (W) and Pan Behind (Y)
- The Rotation Paradigm: The Rotation Tool is entirely subservient to the Anchor Point. A poorly placed anchor point results in catastrophic off-axis orbital rotations.
- The Magnetic Pan Behind: When relocating a layer’s center of gravity, always hold
Ctrl. This activates a snapping mechanism that magnetizes the anchor point to the exact geometric center or corners of the layer.
Part 2: The Shape vs. Mask Hazard
One of the most destructive errors in a collaborative workflow is the confusion between Shapes and Masks.
🚨 Critical Warning: Check Your Timeline Before Drawing!
- Layer selected: Drawing with
QorGcreates a Mask that cuts into the existing layer.- Nothing selected: Drawing creates an independent Shape Layer.
The Alt Modifier on the Pen Tool (G): Holding Alt temporarily converts to the Convert Vertex Tool, allowing you to snap a flowing curve into a sharp linear angle without ever switching tools in the toolbar.
Part 3: The Instant Property Keys
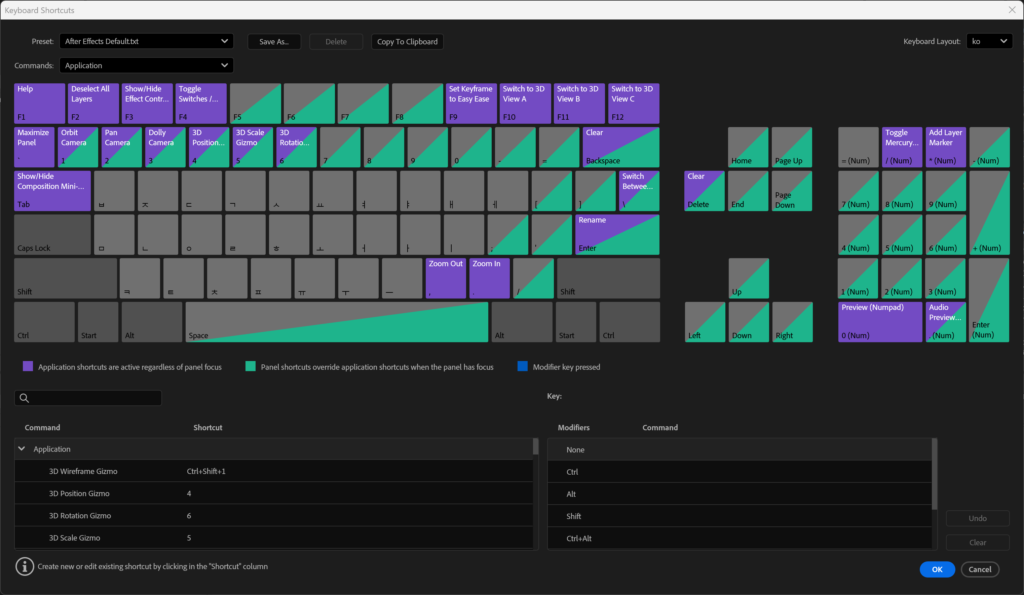
Never twirl down the layer arrows to find a property again. Strike these keys to instantly summon the exact parameter you need:
| Key | Property |
|---|---|
P | Position |
S | Scale |
R | Rotation |
T | Opacity (Transparency) |
A | Anchor Point |
The U / UU Revelation
U: Reveals only properties with active keyframes.UU: Reveals every property modified from its default state — the ultimate debugging tool for dissecting complex templates.
The Trimming Guillotine
Dragging layer edges is an amateur habit. Use the Current Time Indicator instead:
Alt + [: Instantly slices the layer’s In-Point to the current time.Alt + ]: Instantly slices the layer’s Out-Point to the current time.J/K: Jump to the previous / next keyframe with zero error.B/N: Instantly bracket your Work Area for targeted RAM previews.
Part 4: Advanced Layer Architecture
When your composition expands beyond 50 layers, structure becomes survival.
Structural Grouping
- Strategic Pre-composition (
Ctrl + Shift + C): Group related assets. Toggle Collapse Transformations (the sun icon) on any Pre-comp to prevent pixelation when scaling grouped vector assets and to unify 3D hierarchies. - Null Objects & Parenting: Create a Null Object and Parent your visible layers to it. You now have a single master controller for complex camera rigs, character joints, or multi-element HUD animations.
Timeline Hygiene
- Solo Mode: Isolate specific layers instantly. Accelerates RAM Preview by removing non-essential elements from the render queue.
- Layer Locking: Secure backgrounds, master audio, and locked-in client logos to prevent disastrous accidental drags.
- Systematic Labeling: Red for Typography, Blue for Footage, Orange for Backgrounds.
- Naming Convention: Use the
Type_Name_Detailsyntax (e.g.,BG_Forest_Blur,TXT_Title_Glow) to ensure any team member can read your timeline at a glance.
Part 5: Performance Optimization & Blending Modes
- Purge Regularly: Go to
Edit > Purge > All Memory & Disk Cachewhenever the software begins to lag. Keep your pipeline clean. - Proxy Pipeline: For heavy 4K/8K footage, render out low-resolution proxies to keep your timeline responsive.
- Blending Modes:
- Multiply: Drops out white pixels. Perfect for shadows and dark overlays.
- Screen / Add: Drops out black pixels. Exclusively for light leaks, fire, and glowing effects.
- Overlay: Injects contrast and carries color-grading overlays beautifully.
By abandoning reliance on the mouse and treating your timeline as a structured database rather than a digital canvas, you transition from merely “using” After Effects to truly commanding it. Master these shortcuts, enforce these architectures, and watch your bottlenecks disappear.