Interpolation, Graph Editor, and Expressions
If your animations feel robotic and stiff, the problem isn’t your creativity — it’s your understanding of keyframe interpolation. The difference between beginner animation and professional motion design comes down entirely to how you control the journey between keyframes.
In this masterclass, we move past basic definitions and dive deep into interpolation mechanics, Graph Editor sculpting, common pitfalls, and the expressions that automate it all.
Table of Contents
Phase 1: The Anatomy of a Keyframe
A keyframe is not a movement — it is a record of a property’s value at a specific point in time. Between two keyframes, After Effects calculates the transition through a process called Interpolation. Understanding this distinction is the foundation of professional animation.
The 3-Step Creation Rule
- Activate the Stopwatch — Click the stopwatch icon next to a property (Position, Scale, etc.) to start recording.
- Move in Time — Drag your Current Time Indicator (CTI) to the exact moment the movement ends.
- Change the Value — Move the object or adjust the property. AE automatically generates the second keyframe.
⚠️ Critical Warning: Never click the stopwatch again unless you want to erase your work! Clicking an active stopwatch immediately deletes every keyframe on that property.

Phase 2: Spatial vs. Temporal Interpolation
Every animation has two completely separate dimensions: Space (where it goes) and Time (how fast it gets there).
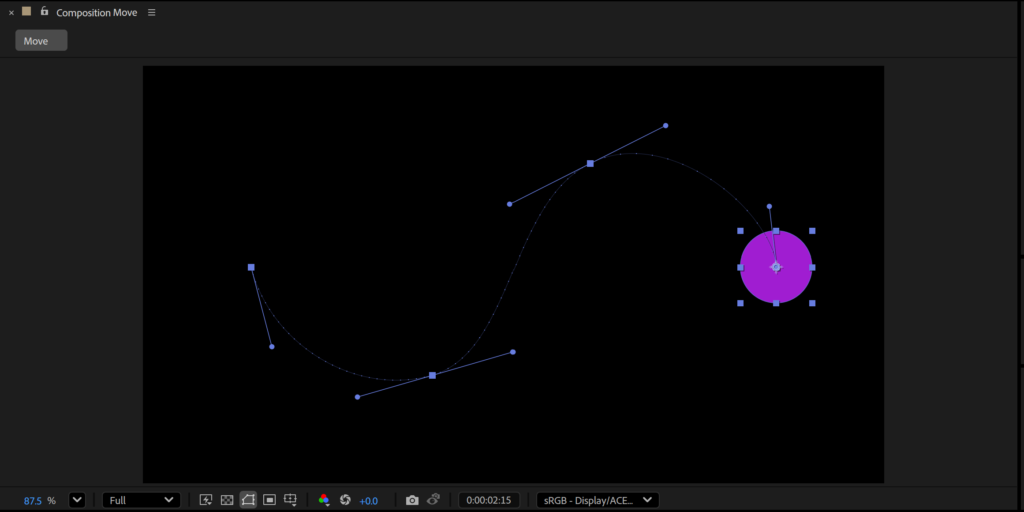
1. Spatial Interpolation — The Motion Path
When you animate Position, a dotted line appears on screen. Wider dot spacing = faster speed; clustered dots = slower.
| Type | Shape | Best Use |
|---|---|---|
| Linear | Straight line | Mechanical, robotic motion |
| Bezier | Curved path | Natural camera moves |
| Auto Bezier | AE auto-calculates curves | Default (can cause Boomerang Effect) |
2. Temporal Interpolation — Speed and Rhythm
| Type | Icon | Behavior |
|---|---|---|
| Continuous Bezier | Hourglass | Smooth speed through middle keyframes |
| Hold | Square | Freezes value until next keyframe — stop-motion, UI cuts |
Phase 3: Surviving the Boomerang Effect
When two identical keyframes cause an object to drift and bounce back, you have hit the Boomerang Effect.
Cause: After Effects applies Auto Bezier to Spatial Interpolation, creating an unintended looping trajectory.
The Fix:
- Select the offending keyframes
- Right-click → Keyframe Interpolation
- Change Spatial Interpolation to Linear
Quick Alternative: Grab the Pen Tool (G), hover over the vertex on the motion path, and click — instantly converts the curve to a straight line.
Phase 4: The Graph Editor — Sculpting Real Physics
Pressing F9 is a start, but true easing is built in the Graph Editor.
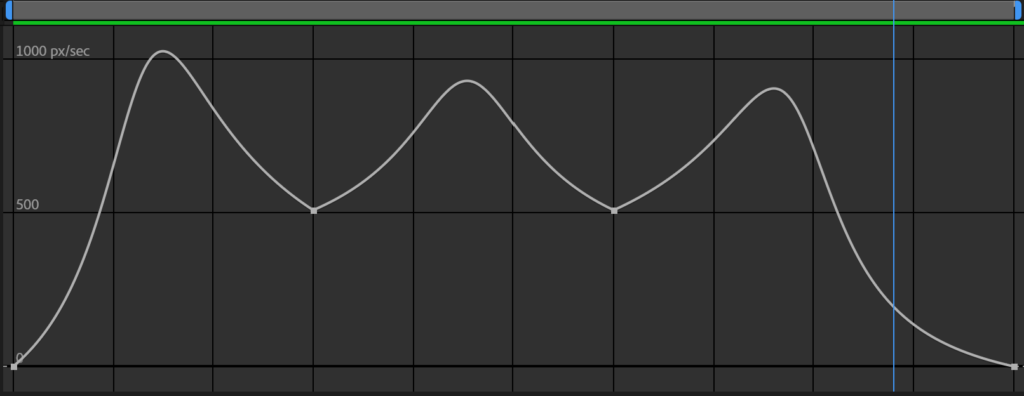
Value Graph vs. Speed Graph
| Graph | Visualizes | Best For |
|---|---|---|
| Value Graph | Actual property values (coordinates, degrees) | Overshoot / spring animation, bounce effects |
| Speed Graph | Velocity (pixels/second) — peaks = fast | Position — dramatic accelerations and silky stops |
💡 Pro Tip: For Position properties, right-click → Separate Dimensions to control X and Y graph curves independently.
The Easing Trinity
| Shortcut | Function |
|---|---|
F9 | Easy Ease — smooth acceleration AND deceleration |
Shift + F9 | Ease In — gradually decelerates into the keyframe |
Ctrl + Shift + F9 | Ease Out — gradually accelerates out of the keyframe |
Phase 5: High-Speed Workflow Tactics
- Precision Navigation (
J&K): Never drag the CTI blindly.Jsnaps to the previous keyframe,Ksnaps to the next — zero frame error. - Roving Keyframes (Time Elasticity): Select all keyframes, hold
Alt, drag the last keyframe to stretch or compress the entire animation proportionally — like a rubber band. - Work Area Isolation (
B&N): PressBto set the start andNto set the end of your work area. Loop only the section you’re refining. - Copy/Paste Keyframes: Keyframes always paste starting at the CTI. Verify your playhead location before pasting to avoid creating accidental new keyframes in empty space.
Phase 6: Automating Motion with Expressions
Alt-Click the stopwatch to open the expression editor and type code instead of plotting hundreds of keyframes.
| Expression | Effect |
|---|---|
loopOut("cycle") | Repeats existing keyframes infinitely |
loopOut("pingpong") | Plays forward then backward forever — pendulums, breathing |
wiggle(frequency, amplitude) | Random organic movement — wiggle(5, 20) = 5x/sec, 20px range |
valueAtTime(time - 0.5) | Echo effect — copies another layer’s animation with a 0.5s delay |
Phase 7: The Professional Plugin Stack
| Plugin | Core Function |
|---|---|
| Motion (Mt. Mograph) | Slider-based easing presets, one-click anchor alignment — the Swiss Army Knife |
| Flow | Visual library of preset easing curves — build, save, and apply in one click |
| EaseCopy | Copies only the easing data from one keyframe set and pastes it onto another |
Keyframes in After Effects are highly obedient, but they are incredibly literal. By mastering spatial and temporal interpolation, sculpting the Graph Editor, and integrating expressions into your workflow, you elevate your work from basic software manipulation to genuine motion art. Stop letting the software dictate your animation — start taking absolute control of your timeline.