Speed Graph, Influence, and Physics Without Expressions
The difference between robotic animation and motion with true “soul” doesn’t come from expensive plugins or complex effects. It comes from mastering the Graph Editor. Most beginners default to F9 Easy Ease and leave it at that — but this guide goes far deeper, exploring the advanced techniques used by professional motion designers to craft animations that feel genuinely alive.
Table of Contents
1. Speed Graph vs. Value Graph: The Strategic Choice
Most beginners default to the Speed Graph, but professionals constantly toggle between the two depending on what they need to control.
| Speed Graph | Value Graph | |
|---|---|---|
| Y-Axis Shows | Velocity (higher = faster) | Actual property values (pixels, degrees, %) |
| Best For | Matching rhythmic pacing, controlling acceleration curves | Bounces, overshoots, complex arc trajectories |
| Access | Right-click → Edit Speed Graph | Right-click → Edit Value Graph |
💡 Pro Tip: For snappy UI animations, use Speed Graph. For bouncing balls or swinging pendulums, you must use the Value Graph.
2. The Easing Trinity — Through the Lens of Physics
| Shortcut | Name | Physical Meaning | Graph Shape |
|---|---|---|---|
F9 | Easy Ease | Both acceleration + deceleration | Perfect dome |
Ctrl+Shift+F9 | Ease Out | Starts from rest, gradually accelerates | Upward slope from zero |
Shift+F9 | Ease In | Moving fast, smoothly brakes to zero | Downward slope to zero |
The Pro Formula: First keyframe → Ease Out · Last keyframe → Ease In · Middle keyframes → Easy Ease
3. The Professional Secret: Separate Dimensions
Animating a bounce or arc with the default Position property is frustrating because X and Y coordinates are locked together.
The Fix: Right-click Position → Separate Dimensions
Why it matters: In reality, horizontal momentum and vertical gravity operate independently. With Separate Dimensions, you can give the X-axis a smooth, linear travel speed while applying a dramatic, gravity-driven bounce curve exclusively to the Y-axis — the hallmark of professional physics simulation.
4. The Mathematics of Tension: Influence Guidelines
Rather than tugging handles by feel, use Ctrl + Shift + K (Keyframe Velocity) to type exact Influence percentages — ensuring stylistic consistency across an entire project.
| Influence | Feel | Best Used For |
|---|---|---|
| 33% | Casual, everyday smoothness | Background elements, secondary motion |
| 60–75% | Polished, deliberate deceleration | Corporate explainers, UI/UX animations |
| 85–100% | High-energy, dramatic tension | Kinetic typography, sports brands |
| Out 100% / In 30% | Explosive launch, sharp landing | High-impact reveal animations |
| Out 70% / In 100% | Smooth arrival, snap-lock stop | Magnetic settling effects |
⚠️ The Teleportation Glitch: Pushing Influence above 95% on both sides forces the middle of the speed curve to spike violently. The object must compensate for the slow start and end by moving at impossible speed in the middle, causing it to visually skip frames and “teleport.” Always balance your tension — keep it at 90% or below.
5. Sculpting Physics Without Expressions
A true master can simulate physical forces purely through the Value Graph — no code required.
Anticipation (The Wind-Up)
Drag the Bezier handle at your first keyframe slightly in the opposite direction of travel. This creates a subtle dip, making the object visually “crouch” and gather energy before launching forward.
Overshoot (The Elastic Settle)
Pull the graph handle just above the final destination value line, then bring it back down. The curve looks like a wave settling into a flat lake — giving the object a snappy, elastic feeling as it overshoots and springs back.
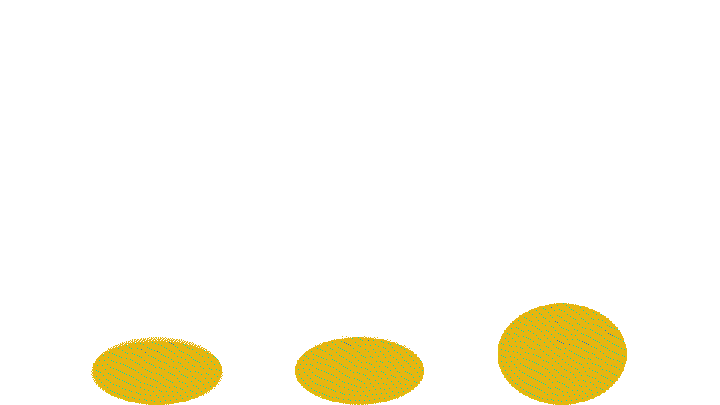
Gravity Bounce
At the peak of the arc: smooth, rounded curves (Easy Ease — gravity decelerates the object).
At the floor impact: break the handles into a sharp “V” shape (Linear) — simulating the instantaneous energy reversal of a collision.
6. Workflow Multipliers: Essential Plugins
| Plugin | Core Function |
|---|---|
| Flow | Visual easing curve library — design, save, and apply to dozens of keyframes in one click. Perfect for sharing curve data across a team. |
| Motion v4 | Swiss Army Knife of AE. Sliders for instant tension control + one-click overshoot, bounce, and excite generation. |
| Ease and Wizz | Applies complex mathematical easing functions (Expo, Elastic, Bounce) directly to keyframes — physically accurate results, instantly. |
7. Connecting the Tech to the Art: The 12 Principles
The Graph Editor’s true power is realized when you connect its functions to the timeless 12 Principles of Animation:
- Slow In and Slow Out: The direct definition of Easing. Curve steepness determines how organic a digital asset feels.
- Follow Through: Offset the same easing curves across multiple layers by a few frames. The synchronized but delayed velocity peaks create a cascading, fluid visual effect.
- Exaggeration: Push Influence to 90%+ to intentionally exaggerate real-world physics — prioritizing emotional impact over strict realism.
Mastering the Graph Editor is not about memorizing shortcuts. It is about developing an eye for rhythm and a feel for physics. Stop settling for linear movement — dive into the curves and give your animations the soul they deserve.