The Studio-Grade Optimization Guide
While beginners focus entirely on learning new effects and keyframing techniques, industry professionals know that the true secret to meeting tight deadlines lies in pipeline optimization, system architecture, and rigorous file management.
In high-end motion design studios and VFX agencies, a poorly managed After Effects project doesn’t just cause minor inconveniences — it leads to critical system crashes, delayed renders, and massive financial bottlenecks.
Table of Contents
Part 1: Hardware Architecture & Engine Optimization
To extract every ounce of performance from After Effects, you must go beyond simply allocating RAM.
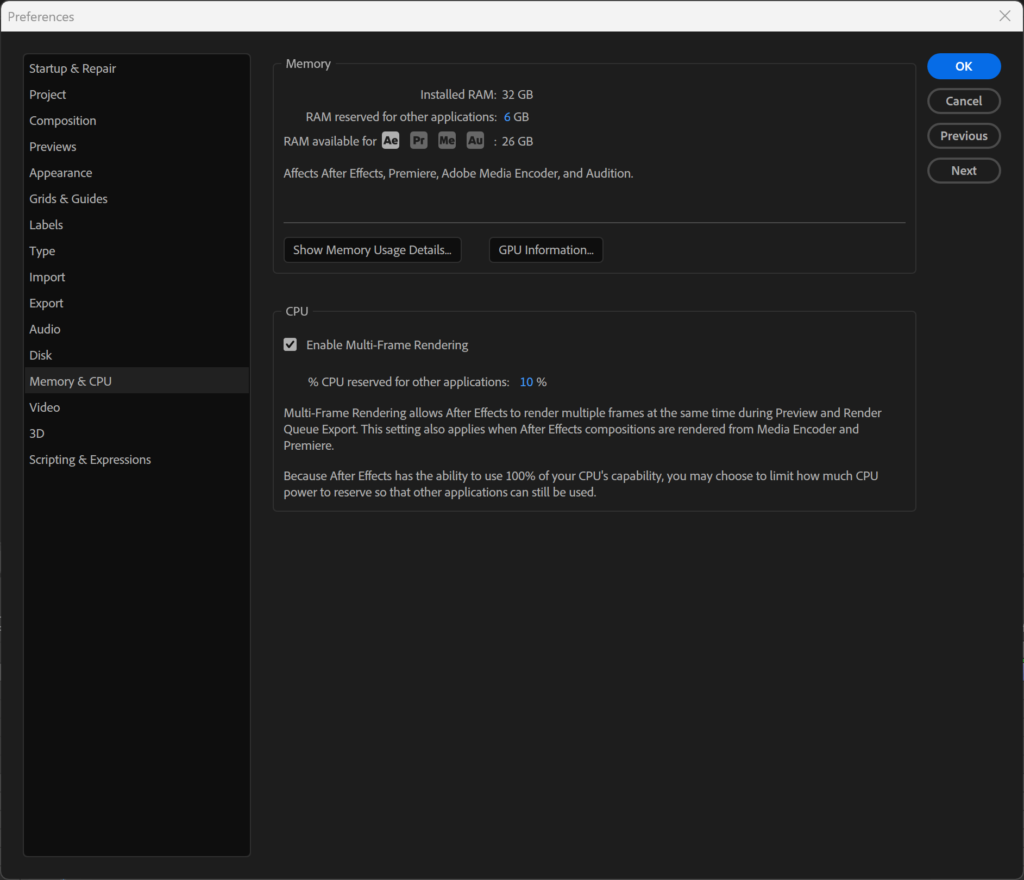
Multi-Frame Rendering (MFR) Allocation
- Navigate to:
Edit > Preferences > Memory & CPU - Strategic Allocation: Reserve 20–30% of your total CPU cores and RAM (e.g., 8GB from a 32GB system) for the OS and background applications. Giving After Effects 100% of your RAM will freeze the entire workstation.
The NVMe Infrastructure (Dedicated Cache)
⚠️ Golden Rule: Never put your Disk Cache on your OS drive or your project drive.
Install a dedicated 1TB+ NVMe M.2 SSD solely for After Effects Disk Cache. Set the path and allocate at least 500GB for the Maximum Disk Cache Size. The read/write speed of this drive dictates the real-time responsiveness of your entire workflow.
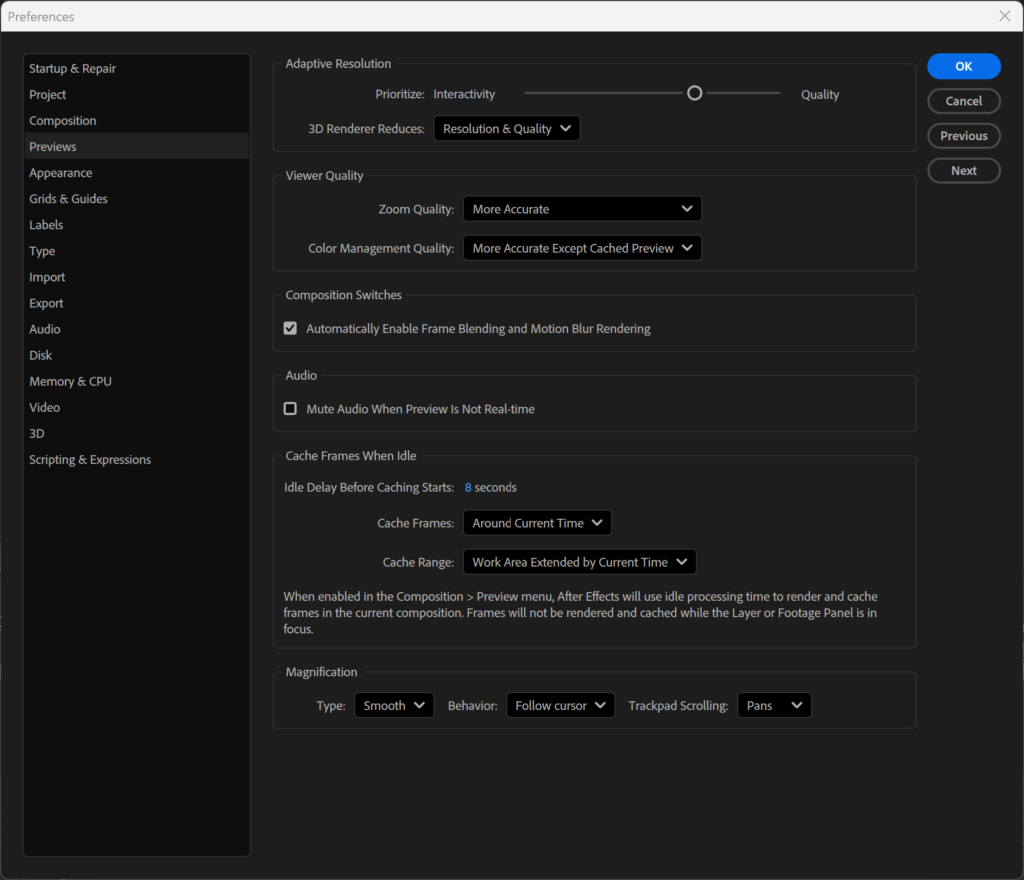
Speculative Preview / Cache Frames When Idle (Zero Idle Time)
- Navigate to:
Composition > Preview > Cache Frames When Idle(formerly “Speculative Preview” in older AE versions) - Detects when you are idle for even a few seconds and automatically begins rendering the rest of your timeline in the background. By the time you touch your mouse again, your RAM cache is fully loaded.
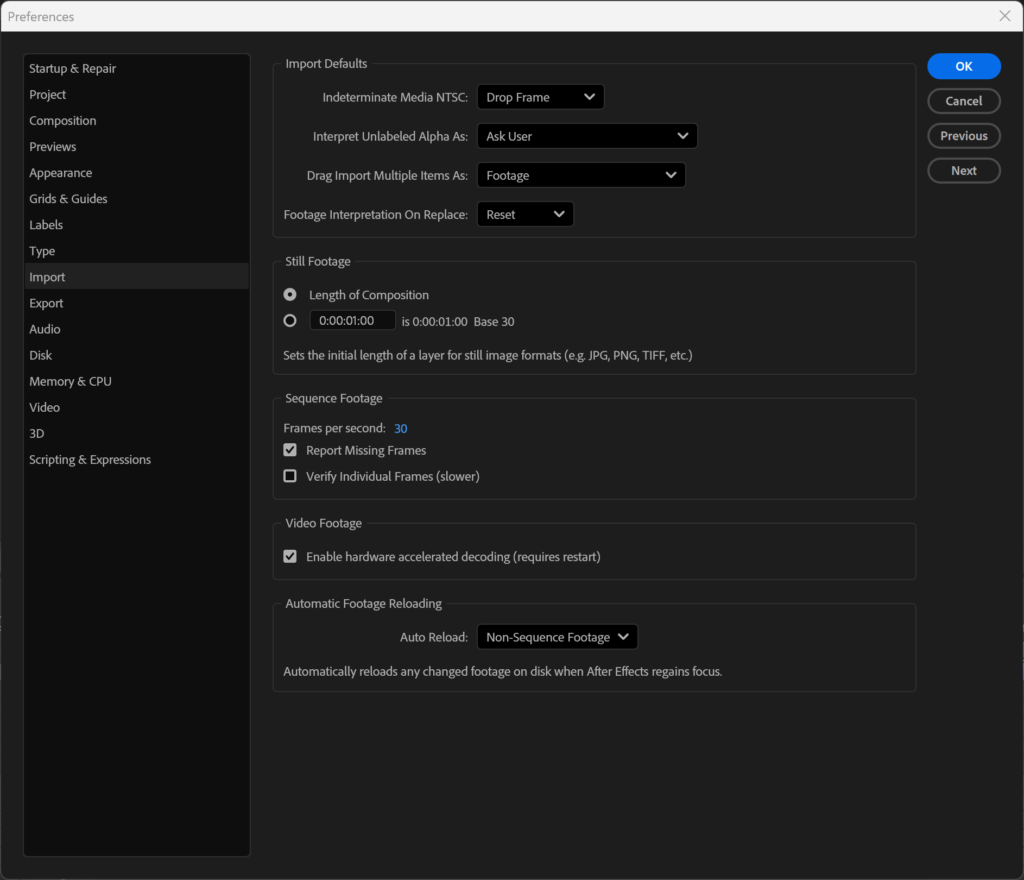
GPU Acceleration & Hardware Decoding
- Studio Drivers: Completely uninstall NVIDIA “Game Ready” drivers and install the NVIDIA Studio Driver for Adobe Creative Cloud stability.
- Hardware Decoding: Enable at
Preferences > Import > Hardware Accelerated Decodingto shift H.264/HEVC decompression from CPU to GPU.
Part 2: Professional Color Management Pipeline
Working in standard sRGB is no longer acceptable for high-end commercial pipelines.
OpenColorIO (OCIO) and ACES
- Implementation:
Project Settings > Color→ Change Color Engine to OCIO - ACEScg Working Space: Ensures mathematical color consistency across Cinema 4D, Maya, and After Effects. Provides a massive dynamic range — bright highlights roll off naturally without harsh clipping.
Bit-Depth Strategy
| Bit Depth | Use Case |
|---|---|
| 16-bit | SDR delivery — eliminates gradient banding |
| 32-bit Float | HDR/VFX — preserves pixel data beyond white (>1.0), supports EXR multipass |
Part 3: Enterprise-Level Project Structure and Archiving
Automated Standardization with Post Haste
Stop creating folders manually. Use Post Haste to generate a standardized directory tree before opening After Effects:
📁 01_Footage    (Subdivided by Camera/Format)
📁 02_Assets     (Audio, Vectors, Fonts, 3D Renders)
📁 03_Comps      (AE Project Files)
📁 04_Exports    (WIPs and Final Deliverables)
Cross-Platform Collaboration Protocols
⚠️ Strict Naming Conventions: Never use regional characters (Korean Hangul, accents, emojis) in file names, layer names, or folder paths. OS-level encoding differences cause severe character corruption or broken file paths across macOS and Windows.
High-Resolution Proxy Workflows
- Import heavy footage → Right-click → Transcode to ProRes 422 Proxy
- Work with proxies ON for smooth animation
- Switch proxies OFF for final rendering — After Effects reverts to original automatically
Importing Footage: New Comp from Selection
Never drag footage directly onto the timeline. Drag it to the New Composition icon at the bottom of the Project Panel. After Effects creates a composition that perfectly matches the source’s resolution, frame rate, and duration — zero mismatch errors.
Project Diet and Archival (Dependencies)
Before archiving or handing off a project:
File > Dependencies > Reduce Project— purges unused assetsFile > Dependencies > Collect Files— bundles the AE project and all linked assets into a single unbreakable directory
Part 4: The Production Security Preferences
- Render Start Auto-Save: In
Preferences > Auto-Save, enable Save when starting Render. Rendering pushes hardware to its absolute limit — this creates a permanent backup the moment before the heavy lifting begins. - Script Access:
Preferences > Scripting & Expressions > Allow Scripts to Write Files and Access Network— mandatory for modern workflow plugins.
Part 5: The Professional Tool Stack
| Tool | Category | Core Functionality |
|---|---|---|
| Overlord | Vector Integration | Pushes Illustrator vector paths directly into AE as native shape layers — no save/import cycle |
| KBar | UI Customization | Creates custom dockable toolbars mapped to your most-used effects and scripts |
| Motion 4 | Animation & Rigging | Advanced easing curves, one-click anchor alignment, and complex rig automation |
| BG Renderer Max | Pipeline Output | Renders multiple AE instances in the background while you continue working |
Transitioning from an amateur setup to a studio-grade After Effects pipeline requires a mindset shift. It is no longer just about knowing how to use the software, but knowing how to manage the data, math, and hardware that drives it. By implementing dedicated NVMe caching, ACES color management, strict folder automation, and proxy workflows, you will eliminate technical roadblocks and focus entirely on the creative process.