Bit Depth, Transform, and Physics-Based Animation
In the realm of motion graphics and visual effects, the gap between an amateur and an industry professional is rarely defined by flashy plugins or trendy templates. It is dictated by a profound understanding of the digital space you work within and the mathematical laws that govern movement.
This guide takes a completely different approach to the standard beginner’s tutorial. We are moving beyond the simple “how-to” and diving deep into industry-standard workflows for Composition Management and Advanced Transform Properties.
Table of Contents
Part 1: Architecture of the Digital Canvas
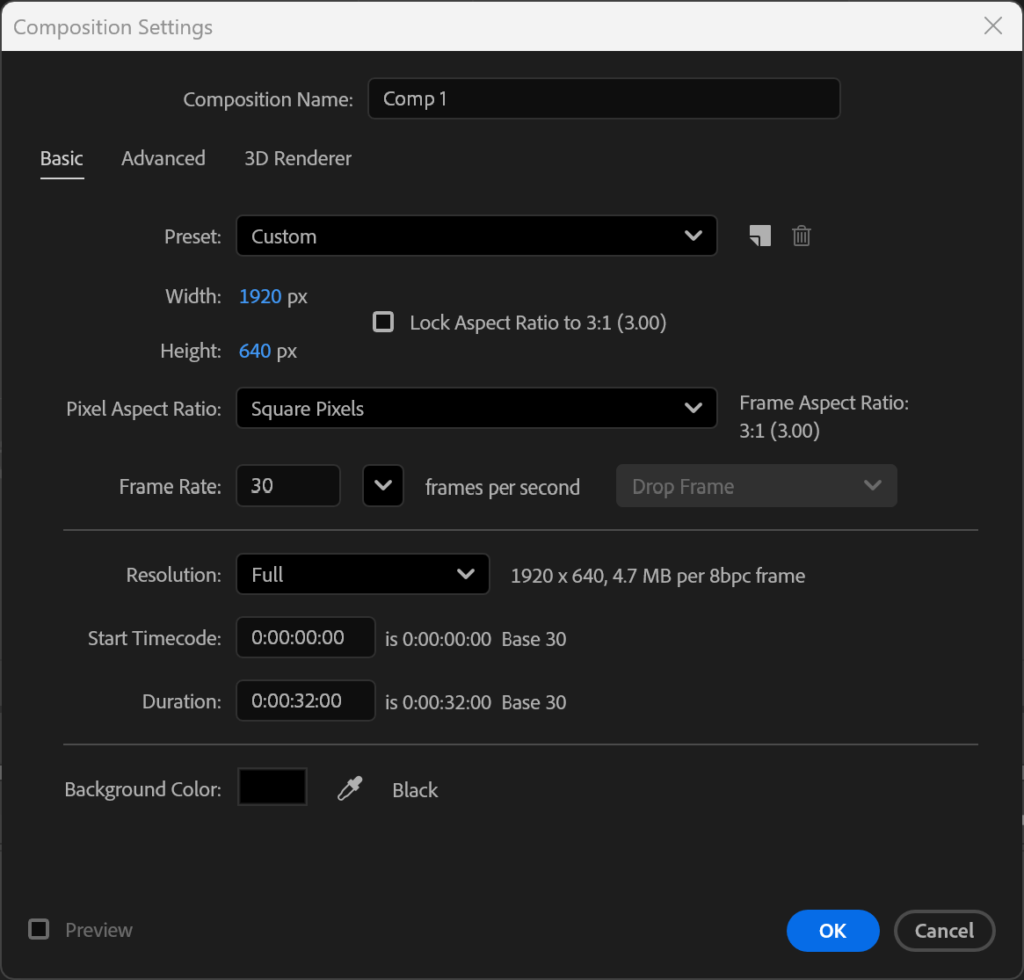
A Composition in After Effects is not just a sequence; it is a meticulously engineered digital stage. Every parameter dictates the computational load, the aesthetic feel, and the final output compatibility of your project.
1. Bit Depth: The Secret to High-End Rendering
The small numbers at the bottom of your Project panel — 8 bpc, 16 bpc, or 32 bpc — represent Color Bit Depth, which governs your composition’s color fidelity.
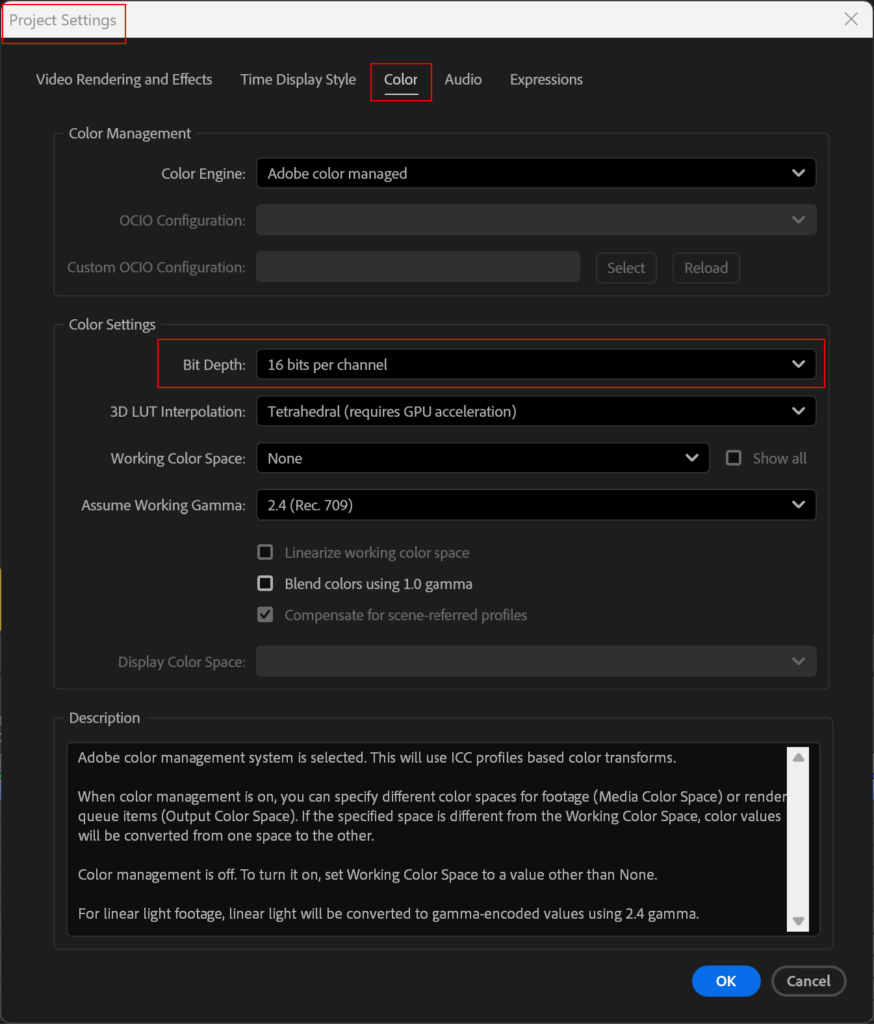
- 8 bpc (Millions of Colors): The default setting. Fine for flat-color vector graphics, but will cause severe banding (stepped lines) in subtle gradients, glows, or shadows.
- 16 bpc (Trillions of Colors): The Industry Standard. Virtually eliminates gradient banding and allows for professional-grade color grading operations without data loss.
- 32 bpc (Floating Point): Required for true HDR compositing. Highlights retain pixel data beyond white (
1.0), allowing manipulation of intense light sources, realistic flares, and complex CGI multipass renders without clipping.
2. Pixel Aspect Ratio and Resolution
Ensure your Pixel Aspect Ratio is always set to Square Pixels (1.0). Modern digital displays — from smartphones to 8K monitors — render in square pixels. Legacy non-square formats (D1/DV at 0.91 or 1.21) are relics of CRT televisions; using them accidentally results in heavily distorted renders.
3. Frame Rate and Its Psychological Impact
Frame rate is a creative choice as much as a technical one:
| fps | Feel | Primary Use |
|---|---|---|
| 23.976 / 24 | Cinematic, premium | Feature films, brand films |
| 29.97 / 30 | Broadcast & web standard | YouTube, social media, TV |
| 59.94 / 60 | Hyper-smooth | Sports, gaming, UI/UX |
4. Safe Margins in the Mobile Era
Even on edge-to-edge mobile screens with notches and dynamic islands, safe margins are critical:
- Action Safe (90%): Keep critical motion within this zone to avoid hardware bezels.
- Title Safe (80%): All readable text and vital logos must remain within this boundary.
Part 2: Coordinate Space and Transform Mastery
To master After Effects, stop guessing where your layers will go and start understanding the mathematical grid that governs them.
The Inverted Coordinate System
Unlike traditional Cartesian geometry, digital screen space is inverted:
- Origin (0,0): Top-left corner of the composition.
- X-Axis: Increases positively moving right.
- Y-Axis: Increases positively moving DOWN. Moving objects upward requires subtracting Y.
- Center: In a standard 1920×1080 composition, dead center is
(960, 540).
The 5 Transform Properties
Memorize these hotkeys until they are automatic: A (Anchor Point), P (Position), S (Scale), R (Rotation), T (Opacity).
💡 Pro Tip: Hold
Shiftwhile tapping these keys to reveal multiple parameters simultaneously without collapsing your timeline.
Anchor Point — The Center of Gravity
Every scale and rotation operation uses the Anchor Point as its pivot. A poorly placed anchor point results in catastrophic off-axis rotations.
- Pro Solution: Use the Pan Behind Tool (
Y). HoldCtrlwhile dragging to snap the anchor point to the exact geometric center or corners of the layer. Alternatively, useCtrl + Alt + Hometo instantly snap it to the layer’s visual center.
Separate Dimensions for Complex Motion
For motion like a bouncing ball, right-click Position → Separate Dimensions. This isolates X and Y channels, allowing you to build linear forward momentum on X while crafting complex parabolic curves on Y independently.
Part 3: Advanced Physics and Layer Logic
Null Objects and Parenting Workflows
A Null Object (Ctrl+Alt+Shift+Y) is an invisible, non-rendering layer used exclusively as a control rig.
- Local vs. World Space: Parenting a child layer to a Null shifts that layer’s coordinate system from World Space (relative to composition origin) to Local Space (relative to parent Null). The child’s timeline values do not change when the parent moves — this allows you to animate macro movements via the Null while preserving clean, zeroed-out micro-animation properties on the child layers.
The Sun Icon: Two Completely Different Functions
This single checkbox causes more rendering errors than any other feature in After Effects:
- Continuously Rasterize (Vector / Shape / Text Layers): Tells After Effects to constantly recalculate the mathematics of an Illustrator
.aifile. Scale a logo to 5000% — it remains infinitely sharp. - Collapse Transformations (Pre-Compositions): Allows data to flow “through” the barrier of a nested composition. Without it, 3D layers inside a Pre-comp render as flat 2D video. With it active, internal 3D layers accurately interact with the master composition’s Camera and Lights.
Motion Blur and Shutter Angle
Enable Motion Blur on layers and the timeline. Then go to Ctrl + K → Advanced → Shutter Angle to dial in your cinematic quality:
- 180° (Default): Standard cinematic camera blur.
- 360°: Heavy, dream-like smearing for stylized action sequences.
- 90°: Crisp, staccato movement — the “Saving Private Ryan” aesthetic.
Graph Editor: Sculpting True Physical Momentum
Never settle for a basic Easy Ease (F9). Dive into the Graph Editor:
- Speed Graph: Visualizes velocity (pixels per second). Essential for Position. Aggressively pull influence handles to create “snap” animations that accelerate violently and ease gently into resting positions.
- Value Graph: Visualizes the actual parameter amount. Best for Scale, Rotation, and Opacity to create spring-like overshoots or precise mechanical easing.
Mastering After Effects is not about learning a thousand tools; it is about mastering a few foundational systems so deeply that they become an extension of your thought process. Rigorously manage your Composition settings, understand Local vs. World space, leverage Null Objects for structural rigging, and sculpt your Graph Editor curves for true physical momentum — and the complexity of your future projects will scale effortlessly.